Plan2Live™
Plan2Live Manual
For Plan2Live 2.8.4 (build 69). The latest version is always at plan2liveapp.com/manual.
- 1. Welcome to Plan2Live
- 2. Installing and signing in
- 3. Typing your setlist
- 4. Importing from Planning Center
- 5. Stems: folders and matching
- 6. Guide analysis and section markers
- 7. Click and Guide tracks
- 8. Output folder and Ableton version
- 9. Custom Templates
- 10. Building the set
- 11. Opening the set in Ableton Live
- 12. Settings and your account
- 13. Updating Plan2Live
- 14. Troubleshooting
- 15. Privacy and permissions
- 16. Plans and billing
- 17. FAQ
- 18. Getting help
Chapter 1
Welcome to Plan2Live
What Plan2Live does, what you need, and how a build goes from a setlist to an Ableton Live set.
Plan2Live is a Mac app that builds your Ableton Live set for you. You give it the setlist and show it where your stems live. It lays the songs out in order, each with its own key, tempo and time signature, puts every stem on its track, and marks each song's sections. Then you open the set in Ableton Live and rehearse.
It's made for anyone who runs tracks in Ableton Live: bands and cover acts, artists and music directors, playback engineers and worship teams.
How a build works#
- Bring in the setlist. Type the songs in, or import a plan from Planning Center. See Typing your setlist and Importing from Planning Center.
- Point at your stems. Choose the folder (or drive) where your song folders live. Plan2Live finds each song's folder and puts each file on the right track. See Stems: folders and matching.
- Let it read your Guide. If a song has a Guide track with spoken cues like "verse" or "chorus", Plan2Live listens to it on your Mac and names the section markers after them. See Guide analysis and section markers.
- Check and generate. The Confirm + Edit screen shows every song and what Plan2Live found for it. When it all looks right, press GENERATE PROJECT. See Building the set.
- Open it in Live. Press Open in Ableton, give it a listen, and rehearse. See Opening the set in Ableton Live.
What you need#
- A Mac with macOS 14.6 or later. Apple Silicon and Intel Macs both work.
- Ableton Live 12 Standard or Suite is recommended. Live Intro and Lite allow too few tracks for the built-in template.
- Your stems, in one folder per song. Plan2Live doesn't sell or supply stems.
- A Plan2Live account. It's free, and your first 2 builds are free too.
- Planning Center is optional. Plenty of people just type their setlist.
What Plan2Live doesn't do#
- It runs on a Mac only.
- It builds in Arrangement View, not Session View.
- It doesn't play the set. You run it in Ableton Live, like a set you made yourself.
- The built-in template doesn't make a click. If you want a click, bring a click stem.
- It doesn't add timecode, show-control MIDI or lyrics.
New in version 2.8.4#
- Choosing a plan is quicker. When your free builds are used, Plus and Pro sit side by side with their prices, Yearly shown first, and each has a button that takes you straight to checkout. See When you run out of builds.
- Small free sets ask first. On Free, if a set has very little audio in it, the app asks before it uses one of your free builds. See A set with very little audio.
- Fewer update checks. The app checks for updates about once a day. See Updates find you.
- Sign-in says why. The sign-in screen tells you why there's an account: your free builds and your plan stay with your account, on every Mac you sign in on. See Your account.
New in version 2.8.3#
- Spanish everywhere. With the app set to Español, its screens, windows and messages are in Spanish, not only the main window. See Language / Idioma.
- Manage and cancel in the app. Manage Subscription and Cancel Subscription… in Settings open Stripe's billing page. See Manage or cancel.
- A clearer finished card on Free. It tells you how many free builds you have left, and what Plus gives you once they're used. See The finished card.
- News and an invite code on Create account. See Your account.
- Long Guides show their progress. Each waiting Guide says how many are ahead of it. See How it works.
- A welcome tour that ends. Finish or skip it once and it doesn't come back. See The guided tour.
About this manual#
This manual is written for Plan2Live 2.8.4 (build 69), the version you download today. Where a version works differently from the one before it, the text says so, for example "from version 2.8.4": if you haven't updated yet, see Updating Plan2Live. The pictures were taken in version 2.8.2, so a few words on them have changed since; where that matters, the text gives the new words. Words in bold or in CAPITALS are what you'll see on screen. Use the search box to find any word in any chapter, or read it all on paper with the print view or the PDF.
Chapter 2
Installing and signing in
Download the app, put it in Applications, create your free account, and go through the short setup.
Download and install#
- On plan2liveapp.com, press Download. One download works on Apple Silicon and Intel Macs. On a phone, the site offers to send the link to your Mac instead.
- Open the downloaded
.dmgfile. - Drag Plan2Live into Applications. If macOS says Plan2Live is already there, choose Replace.
- Eject the DMG, then open Plan2Live from your Applications folder.
- If you have another copy somewhere else (for example in Downloads), move it to the Trash, so you always open the one in Applications.
If macOS blocks it#
- Right-click Plan2Live in Applications and choose Open.
- Or go to System Settings → Privacy & Security and click Open Anyway.
Getting Started#
The first time you open Plan2Live, a short Getting Started guide explains the basics in three pages: what Plan2Live does, what you'll need (your account and your song audio; Planning Center is optional), and how to start your first set. Press Next → to go on, or Skip. You can watch it again any time from Settings → Help → Getting Started.
Your account#
You need a Plan2Live account to build. It's free, and so are your first 2 builds, with no card needed.
On the CONNECT. screen:
- CONTINUE WITH GOOGLE signs you in with your Google account (macOS shows its normal web sign-in sheet).
- Or choose CREATE ACCOUNT, type your name, e-mail and a password (twice), and press CREATE ACCOUNT →.
- Already have an account? Use SIGN IN. Forgot your password? Press FORGOT PASSWORD? and then SEND RESET EMAIL →.
From version 2.8.4, SIGN IN and CREATE ACCOUNT also say why there's an account, in one line under the buttons that switch between them: "Why an account? Your 2 free builds and your plan are kept on your account, so they are the same on every Mac you sign in on."
From version 2.8.3, CREATE ACCOUNT has two more things, both up to you:
- INVITE CODE (OPTIONAL): if a friend sent you their invite link, paste the whole link or just its code. Anything that isn't an invite code stops the form with "That isn't an invite code. Paste the whole invite link, or leave this empty." Leave it empty if you don't have one.
- Also send me Plan2Live news and tips. Unsubscribe anytime. This box starts unticked. Tick it only if you want our e-mails.
They're kept on your new account, the same way the website's sign-up keeps them, and they count for CONTINUE WITH GOOGLE too when you choose it on CREATE ACCOUNT.
It's the same account you use on plan2liveapp.com, so your plan follows you between the website and the app.
The Setup Wizard#
After you sign in, the Setup Wizard gets two things ready:
- Connect Planning Center (optional). If your team plans in Planning Center, connect it here. If not, press Continue without Planning Center. Everything about connecting is in Importing from Planning Center.
- Choose your song source. Press Choose Song Library and pick the folder or drive that holds your song folders. Plan2Live remembers it and searches it every time. See Stems: folders and matching.
The last page, YOU'RE ALL SET., shows what's connected. Press Start Using Plan2Live →. You can run the wizard again from Settings → Help → Run Setup Wizard.
The guided tour#
Then a few tips point at the main parts of the screen: connecting Planning Center and picking a setlist (if you use Planning Center), the output options, and the GENERATE button. Press Next → (Done → on the last tip), or Skip to end the tour.
From version 2.8.3, each part of the tour shows until you've been through it once, and Skip ends the whole tour, so it doesn't come back every time you open the app. Its tip card always stays inside the window.
Chapter 3
Typing your setlist
Start a new project, add each song with its key, tempo and time signature, and put the songs in order.
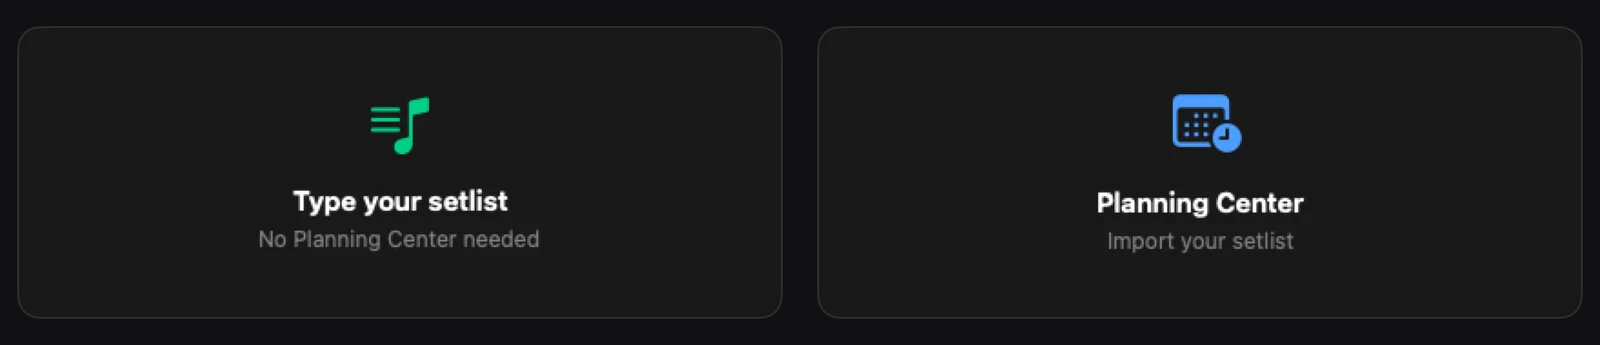
Every set starts on the New Project screen. It has two cards:
- Type your setlist (No Planning Center needed): you add the songs yourself. This chapter.
- Planning Center (Import your setlist): Plan2Live fills the whole set from a plan, in one go. See Importing from Planning Center.
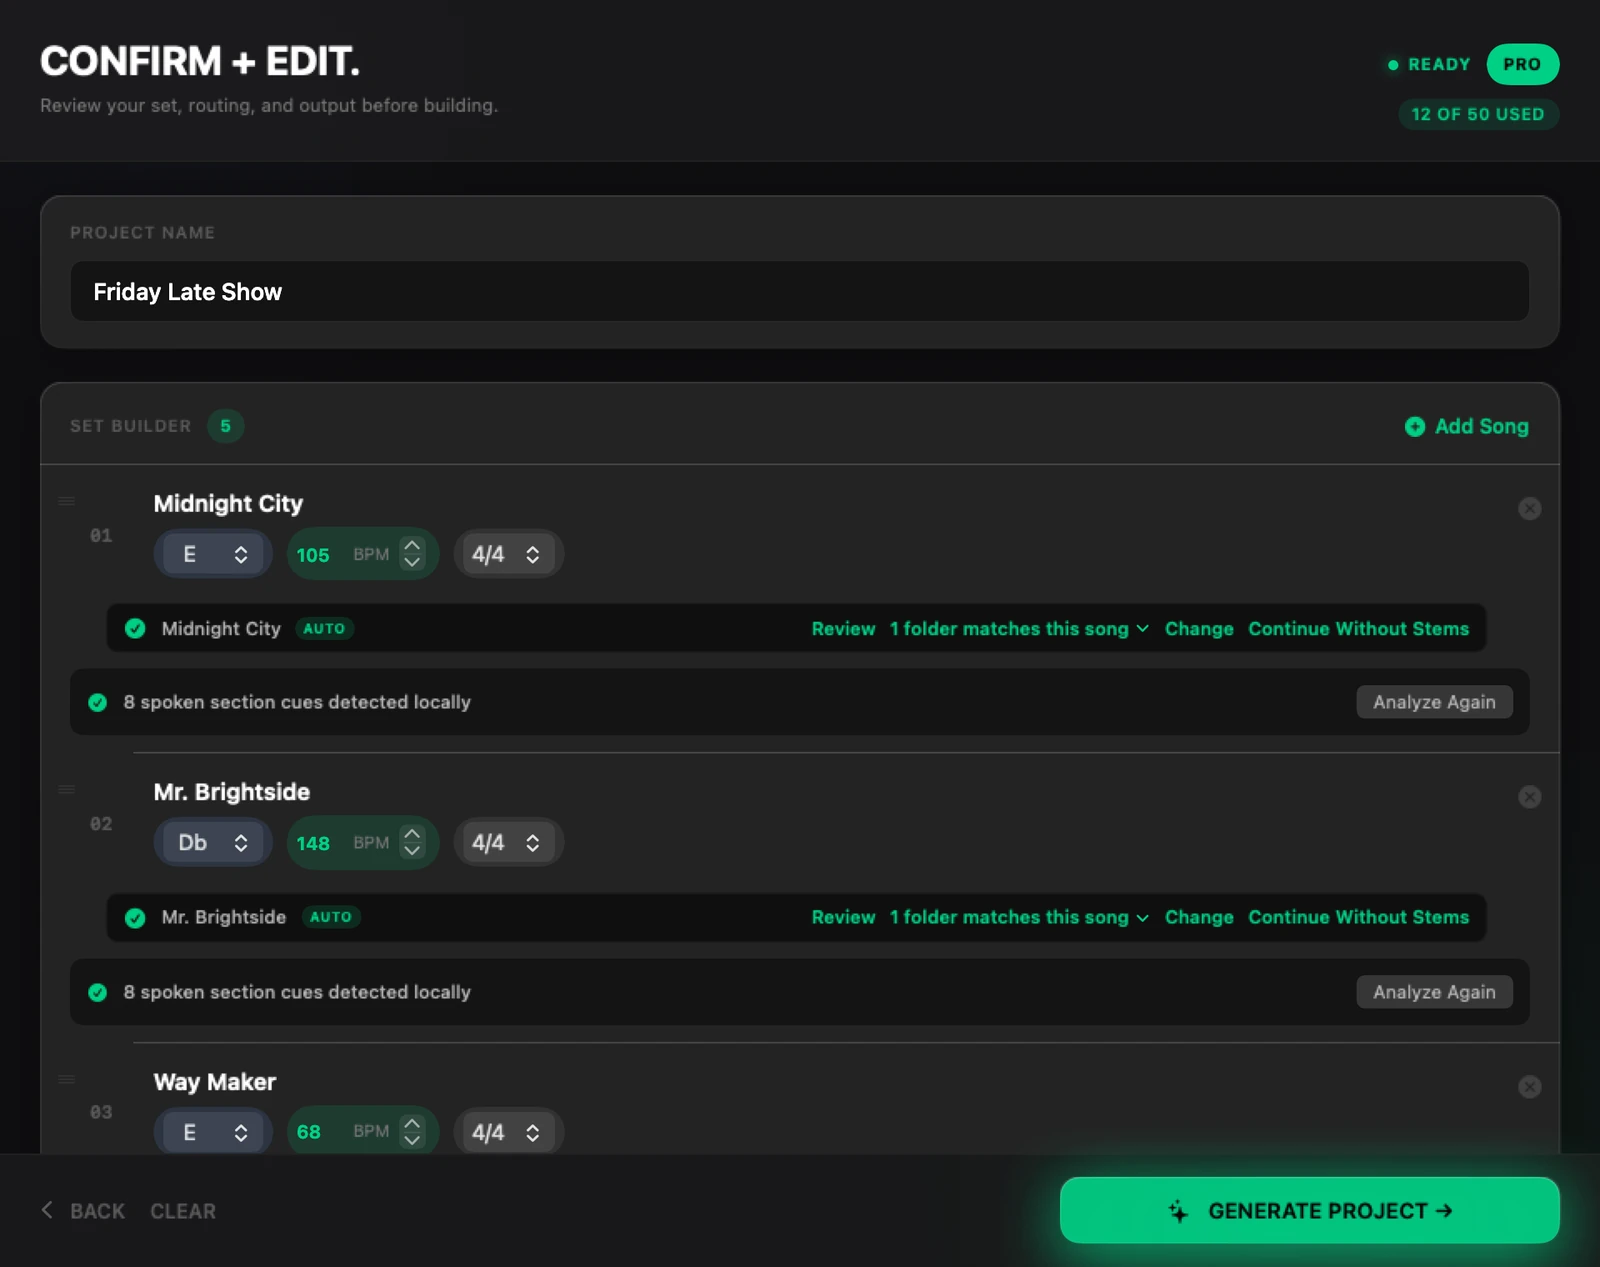
Both lead to the same CONFIRM + EDIT. screen, where you check everything and build.
Name the project#
At the top of Confirm + Edit, type a name in Project Name. The name is used for the project folder and the .als file, so a set called "Friday Late Show" is saved as Friday Late Show Project/Friday Late Show.als. Plan2Live won't build until the project has a name.
Add songs#
In the Set Builder card, press + Add Song. Each song needs four things:
| Field | What to enter |
|---|---|
| Song title | The song's name, spelled the way your stems folder spells it. |
| KEY | C, C#, Db, D, Eb, E, F, F#, Gb, G, Ab, A, Bb or B. |
| BPM | The tempo, from 40 to 240. Halves work too (for example 72.5). |
| TIME SIGNATURE | 4/4, 3/4 or 6/8. |
Press Save Song. It stays greyed out until the song has everything it needs. A set can hold up to 50 songs.
Change, reorder and remove songs#
- Change a song: click its title to open Edit Song, or change the key, BPM or time signature right on its row.
- Reorder: drag a song by its handle (≡) to where it belongs. The set is built in this order.
- Remove a song: press ⊗ on its row and confirm with Remove Song.
- Start over: press CLEAR at the bottom and confirm with Clear Set.
Next week's set#
For a new setlist, change the songs (or press CLEAR and type the new ones) and build again. The sets you already built stay where they were saved. On Pro and Premium, Project History lists them all.
What's next#
Once the songs are in, Plan2Live goes looking for each song's stems: see Stems: folders and matching.
Chapter 4
Importing from Planning Center
Connect Planning Center once, pick a plan, and the whole set comes in with each song's key, tempo, time signature and sections.
If your team plans its services or shows in Planning Center, Plan2Live can bring the whole set in at once: the songs in order, each with its key, tempo and time signature when Planning Center has them, and the song's sections from its arrangement.
Planning Center is optional. If you don't use it, type your setlist instead.
Connect Planning Center#
Plan2Live connects with a Planning Center Personal Access Token. You make one in Planning Center and paste two codes into Plan2Live. You only do this once.
- In your web browser, go to
api.planningcenteronline.com/oauth/applicationsand sign in with your Planning Center account. - Click New Personal Access Token and name it "Plan2Live".
- Copy the App ID and the Secret it shows you.
- In Plan2Live, paste them into PLANNING CENTER APP ID and PLANNING CENTER SECRET, then press Connect Planning Center →. (In the Setup Wizard, the fields are called APPLICATION ID and SECRET, and the button is Connect & Continue →.)
You can reconnect, switch to another Planning Center account, or disconnect any time in Settings → Planning Center (Reload, Switch, Disconnect).
Pick a plan#
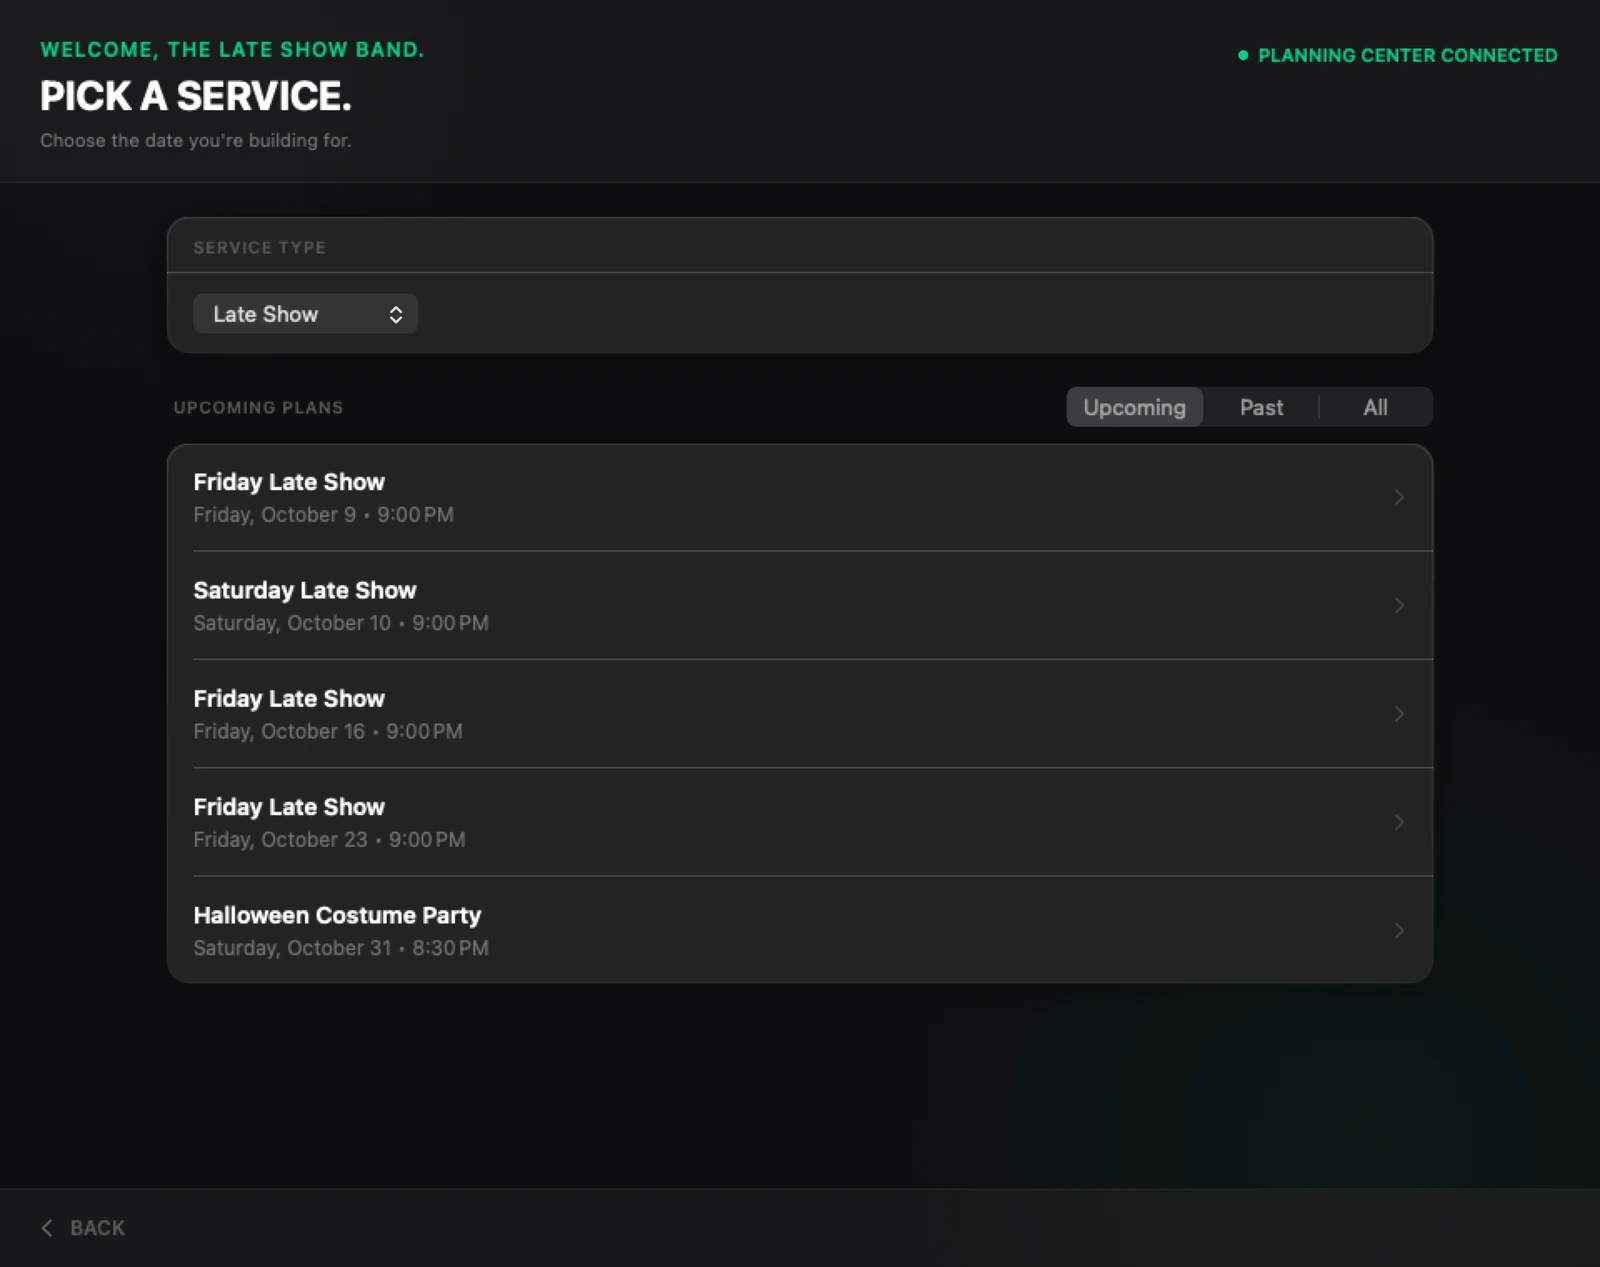
Choose Planning Center on the New Project screen. The PICK A SETLIST. screen opens (in version 2.8.2 it was called PICK A SERVICE.).
- Choose the Service Type you want.
- Choose Upcoming, Past or All, and use Previous and Next to page through the plans.
- Click the plan you're building for. Plan2Live imports it and opens Confirm + Edit.
What comes in#
For each song in the plan, Plan2Live brings in:
- the title;
- the key, when the song's key is set in the plan;
- the tempo, from the arrangement's BPM (or a tempo like "128 bpm" written in the item's notes);
- the time signature, from the arrangement's meter, when it's 4/4, 3/4 or 6/8;
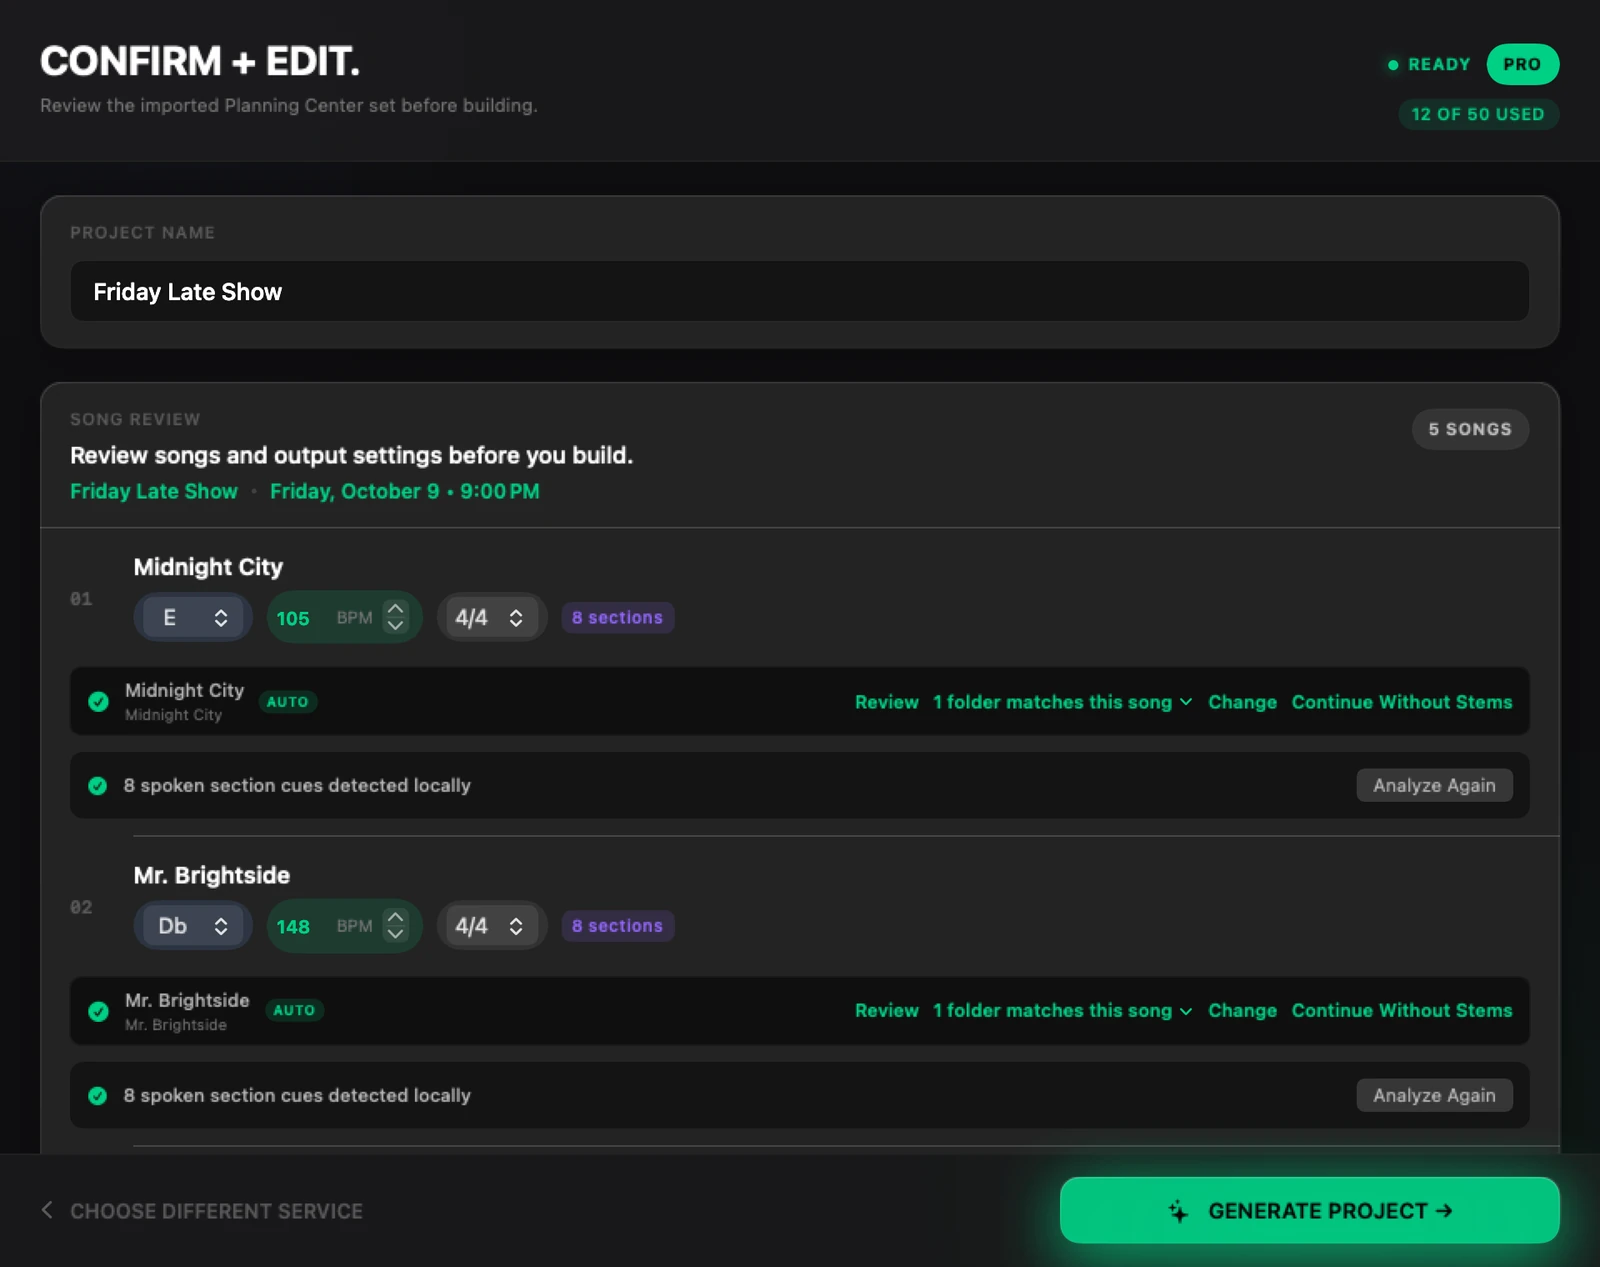
- the sections, from the arrangement's sequence (shown as a purple "8 sections" pill on the song's row).
Items that aren't songs (a welcome, a reading, announcements) are left out. A plan can bring in up to 50 songs. The project is named after the plan, and you can change the name.
If something is missing#
If Planning Center didn't have a key, tempo or time signature for a song (or it had a time signature Plan2Live can't build), that box comes in empty and highlighted, and the GENERATE button tells you what's missing, for example 1 SONG NEEDS A TEMPO ↑. Fill it in on the song's row.
You can change any song's key, tempo and time signature on Confirm + Edit. The song list itself (which songs, in which order) comes from the plan: to change it, change the plan in Planning Center, then press BACK TO PLANNING CENTER at the bottom of Confirm + Edit (in version 2.8.2, CHOOSE DIFFERENT SERVICE) and import it again.
Section names: Guide or Planning Center#
For an imported plan, the Options card has a Guide Analysis Labels row. Choose where the section markers get their names:
- Guide Analysis Labels (the default): from the spoken cues on each song's Guide track. See Guide analysis and section markers.
- Planning Center Labels: from the song's arrangement sections in Planning Center.
If no songs come in#
If a plan has no songs, Plan2Live says "This Planning Center plan has no song items to import." Check that the songs are added to the plan as songs in Planning Center, not as other items.
Chapter 5
Stems: folders and matching
Where to keep your stems, how Plan2Live finds each song's folder, how it puts each file on a track, and what to do when it asks you.
Plan2Live doesn't supply stems. It reads the stems you already have on your Mac (or on a drive), finds the right folder for each song in your set, and copies that song's stems into the new Ableton set, each on its own track.
Your Stems Library#
Your Stems Library is the folder (or whole drive) that holds your song folders. You choose it in the Setup Wizard, in the Stems Library card on Confirm + Edit (Choose Folder / Change Folder), or in Settings → File Access → Stems library. Plan2Live remembers it.
Keep songs in more than one place? Add them in Settings → File Access → Additional stems libraries with Add Library. Plan2Live searches all of them.
When the songs are in, Plan2Live searches your libraries on its own. You can search again any time with Find Stems.
Folder names#
Use one folder per song, named after the song. Song Title - Key - BPM works best, but only the title is needed.
- The title is what the app matches, so spell it the way it's spelled in your setlist. Upper or lower case and accents don't matter.
- The key and BPM are optional. They help the app pick the right folder when you keep the same song in more than one folder (for example, in two keys) and your set gives the song a key or tempo.
- Parentheses and brackets are fine. The app ignores what's inside them when it matches the title, and it reads a key written there, like
(Key of G)or[A]. - A track number at the start (
01 -) and words like "stems" or "multitracks" at the end are ignored too. - If the app isn't sure which folder belongs to a song, it asks you.
Good folder names:
Firm Foundation - G - 98bpm01 - Firm Foundation - G - 98bpmFirm Foundation (Key of G)Firm Foundation [G] 98bpmKing of Kings - B - 72bpm
Things that make the app ask you, or miss the song:
- Spelling the title very differently from your setlist.
- Keeping the same song in two folders with no key in either name. The app can't tell them apart, so it asks you which one to use.
- Putting every song's stems together in one folder, instead of one folder per song.
When Plan2Live asks you#
Each song's row on Confirm + Edit says what Plan2Live found:
- The folder's name, with AUTO: it found the folder by itself.
- "2 folders match this song": press Review Matches and pick the right one. Each folder shows how closely it matches.
- "Plan2Live couldn’t match this folder automatically.": press Choose Folder or Drive and pick the song's folder yourself, or press Continue Without Stems to build the set without that song's stems (the finished card then lists it under Songs left out).
When you pick a folder, Plan2Live remembers it on this Mac and uses it again next time ("Using your earlier choice"), as long as the song and the folders are the same. Press change to pick another.
How files become tracks#
Plan2Live reads WAV, AIFF, FLAC, MP3, M4A and CAF files. It puts each one on a track by its file name:
| File names like | Go on the track |
|---|---|
| Drums, Kit | Drums |
| Perc, Percussion, Shaker, Tambourine | Perc |
| Loop, Drum Loop, Beat | Loop |
| Bass | Bass |
| Synth Bass, Sub | Synth Bass |
| EG1, Electric 1, Guitar 1 | EG 1, EG 2… |
| Keys 1, Synth 1, Pad 1 | Keys 1, Keys 2… |
| Piano, Rhodes, Wurlitzer | Piano |
| Organ, B3, Hammond | Organ |
| FX, SFX | Synth FX |
| BGV, BV, Harmony, Backing Vocals | BGVs |
| Click, Click Track, Metronome | Click |
| Guide, Cues, Guide Vocal | Guide |
Spanish and Portuguese names work too (for example Batería, Guitarra Eléctrica, Teclado, Coros, Guía, Claqueta).
A stem that doesn't fit any of these gets its own new track, named after the file. Stem tracks a song doesn't use are left out of that song, so each song only has the tracks it needs. The Click and Guide tracks always stay.
Review Stem Matches#
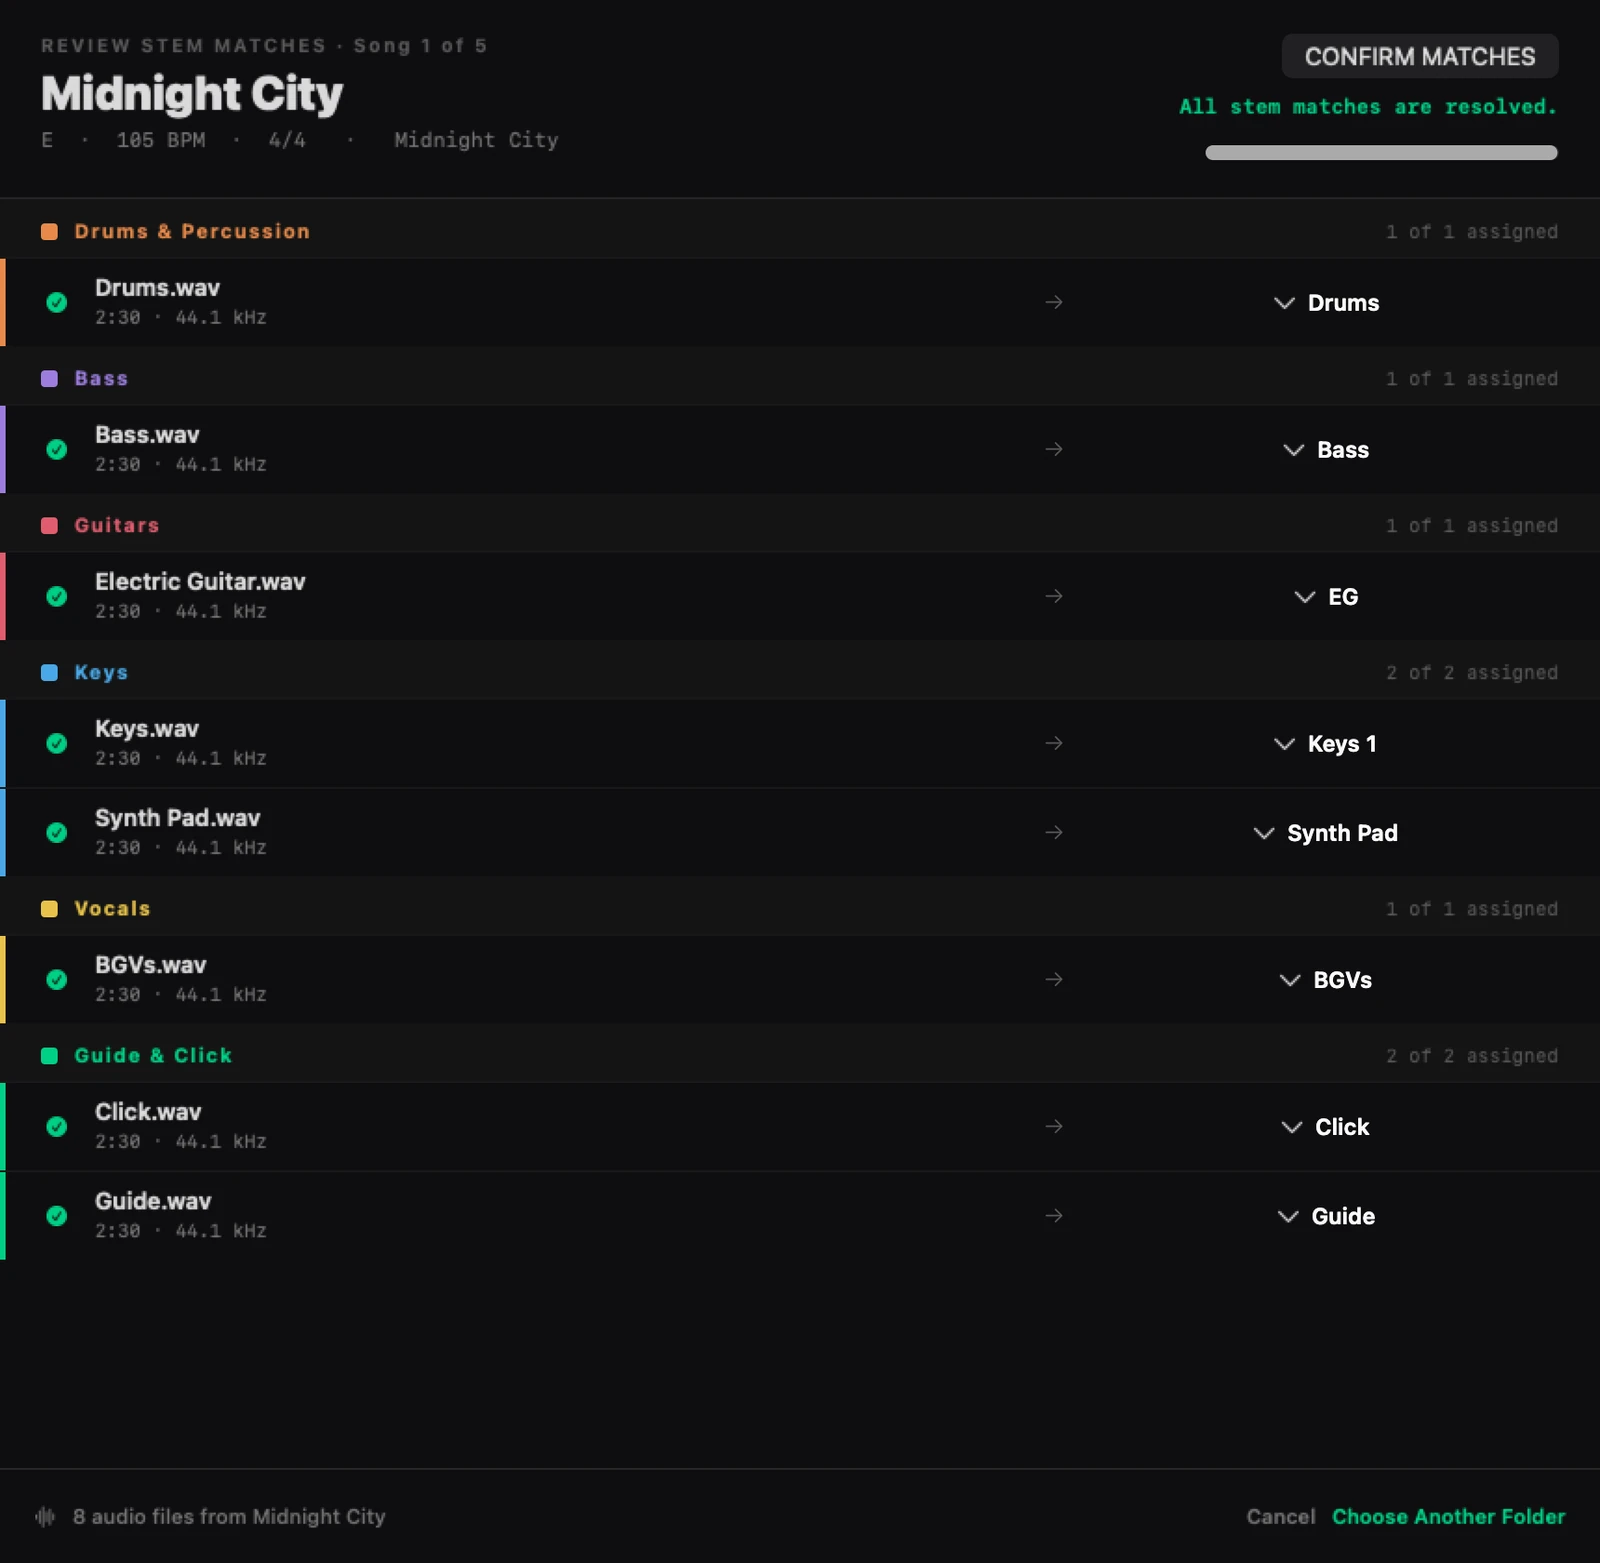
If a file could go on more than one track, or its name is unclear (for example "Drums & Percussion", or "No Drums"), Plan2Live asks. Press Review on the song's row: REVIEW STEM MATCHES shows every file and the track it goes on. For each file marked Needs a track, choose a track, Create new track, or Skip this stem.
Stems in another key#
If the stems folder's name has a key (like Firm Foundation - A - 98bpm) and the song in your set is in a different key, Plan2Live transposes the stems to the set's key. It moves them the shortest way, up to 6 semitones up or down, and the song's row says so (for example: the folder is in A, the song is set to G, so the stems move down 2 semitones). For a jump of 4 semitones or more it adds that the stems may sound thin.
Drums, percussion, loops, the click and the Guide are never transposed. The finished card lists what moved and how far.
Very large libraries#
Plan2Live searches several folder levels deep. If a library is very big, it stops early and tells you so: move your song folders higher up, or add a more specific folder as your library.
If you pick a folder for one song that is really a whole library or drive (more than 128 folders, or more than 128 audio files), Plan2Live says so and asks you for the song's own folder. From version 2.8.3 it tells you much sooner, even for a folder with many thousands of files.
Include stems#
The Include stems switch in the Options card is on unless you turn it off. Turned off, Plan2Live builds the songs with their tempos and section markers, but no audio.
Chapter 6
Guide analysis and section markers
Plan2Live listens to each song's Guide track on your Mac and names the section markers after the cues it hears.
Many Guide tracks have a voice that calls out the sections: "intro", "verse one", "chorus", "bridge". Plan2Live listens for those cues and puts a named section marker where each one starts, so the set is easy to find your way around the moment you open it.
How it works#
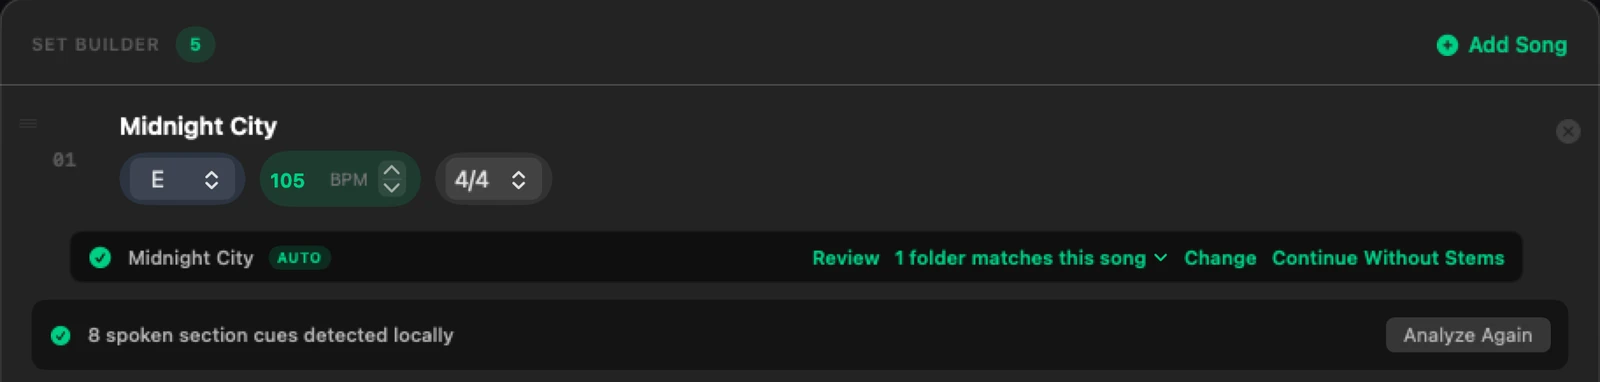
- As soon as a song's stems folder is found and it has a Guide file, Plan2Live starts reading the Guide. You can also press Analyze Guide on the song's row, or Analyze Again to read it once more.
- The Guide is read on your Mac. The audio isn't uploaded anywhere, and no microphone is used.
- While it reads, the row says "Reading Guide cues locally. Generate unlocks when this Guide is ready." GENERATE waits until every Guide is done.
- Guides are read one at a time. From version 2.8.3, a set with many Guides (long medleys, say) shows where each one is: a waiting row says how many Guides are ahead of it ("Guide analysis is queued: 3 Guides are ahead of this one."), the Guide being read counts its spoken parts as it goes ("Reading Guide cues locally: 4 of 9 spoken parts read.") with a filling circle, and the GENERATE button counts the Guides that are ready, for example ANALYZING GUIDES… 3 OF 12 READY.
- When it's done, the row says how many cues it heard, for example "8 spoken section cues detected locally".
Guide reading has been tested on Apple Silicon Macs.
Pick the Guide's language#
In the Options card, set Guide Language to the language spoken on your Guide tracks: English, Español or Português. If your song titles look Spanish, Plan2Live offers to read the Guides in Spanish.
What the markers are called#
Plan2Live knows the usual section words, like Intro, Verse (and Verse 1, Verse 2…), Pre-Chorus, Chorus, Post-Chorus, Bridge, Refrain, Tag, Vamp, Turnaround, Interlude, Instrumental, Breakdown, Outro and Ending. A COUNT marker always sits at the very start, and if there's music before the first spoken cue, Plan2Live adds an INTRO there.
When there are no spoken names#
- The Guide has timing but no names it recognizes: the sections follow the Guide, and they're numbered. The row says "No spoken section names were recognized, so sections are numbered."
- The song has no Guide at all: its sections are spaced evenly, and its Guide track stays empty.
- Placeholder markers: a song without spoken cues can get the placeholder markers COUNT, SECTION 1 and ENDING. The finished card lists those songs.
Either way, you can rename any marker in Live. Or add a Guide with spoken cues and build again.
If a Guide can't be read#
The row explains what went wrong and offers a way on:
- Try Again reads it again.
- Build Without This Guide builds the song from its own structure. The Guide audio is still copied onto the Guide track; only the timing from it is set aside. Use This Guide Again undoes that.
- A silent Guide (Plan2Live can't hear anything in it) won't be different the second time, so there's no Try Again. Pick a different Guide file, or build without it.
- A very long Guide (a long medley, say) can be too long to read. The message tells you the longest it can take for that file: export a shorter Guide, or build without it.
From version 2.8.3, a silent or too-long Guide offers Choose Song Folder (to pick the song's folder again once a different Guide is in it) and Build Without This Guide. A too-long Guide no longer offers a Try Again that would only stop the same way.
Marker styles#
The Markers menu in the Options card sets how sections are written into the set:
| Choice | What you get |
|---|---|
| Regular (the default) | One locator at the start of each section. |
| AbleSet Locators | A locator with the song's title, one for each section, and a SONG END locator. For people who run their sets with AbleSet. |
| AbleSet Sections | A locator with the song's title, and the sections as clips on a Sections track. |
| Off | No Guide reading and no section markers. |
Planning Center section names#
For a set imported from Planning Center, you can take the section names from Planning Center instead of the Guide. See Section names: Guide or Planning Center.
Chapter 7
Click and Guide tracks
Where your click and Guide stems go, and why the built-in template never makes a click of its own.
Every song in the built-in template has a Cues group with two tracks: Click and Guide.
Your click#
Put your click stem in the song's folder, named so Plan2Live can spot it: Click, Click Track or Metronome (in Spanish or Portuguese, Claqueta, Clic, Clique or Contagem work too). Plan2Live puts it on the song's Click track.
The built-in template doesn't make a click. If a song's folder has no click stem, that song's Click track stays empty. The set still builds. If the band plays to a click, bring a click stem for every song.
Your Guide#
Put the Guide stem in the song's folder, named Guide, Guide Track, Cues or Guide Vocal (or Guía / Guia). Plan2Live puts it on the song's Guide track and reads its spoken cues to name the section markers. See Guide analysis and section markers.
No Guide in a song's folder? Then that song's sections are spaced evenly instead of following a recording.
When names collide#
A file whose whole name is just the role, like CLICK.wav or 12-GUIDE.wav, wins over other files that only mention it. If two files could both be the click, Plan2Live asks you in Review Stem Matches (see How files become tracks).
In your own template#
With a Custom Template, Plan2Live looks for your template's own click and guide tracks and puts your stems there. Its review tells you where each one went.
Chapter 8
Output folder and Ableton version
Where your finished set is saved, what's inside its folder, which Ableton Live version it's built for, and the built-in template.
Choose an output folder#
Plan2Live needs to know where to save finished sets. In the Output card on Confirm + Edit, press Choose Folder (or Change Folder), or set it in Settings → File Access → Output folder. There's no folder until you choose one, so the first time the GENERATE button says CHOOSE OUTPUT FOLDER →.
Pick an ordinary folder you can find again, like a "Live Sets" folder in your Music folder or on your show drive. Plan2Live won't save into a shortcut or a system location, and it tells you if you pick one.
What a finished set looks like#
Each build makes one project folder in your output folder:
Friday Late Show Project/— the project folder, named after your project.Friday Late Show Project/Friday Late Show.als— the Ableton Live set.Friday Late Show Project/Samples/Imported/— a copy of every stem the set uses, one folder per song.
Because the stems are copied into the project, the project folder has everything the set needs. You can move it, or copy it to another Mac, as one folder. Your original stems folders are never changed.
If a project with the same name is already in the output folder, Plan2Live never overwrites it. It saves the new one under a free name and tells you which ("Saved as …, because … is already in …"), leaving the old folder exactly as it was.
Choose the Ableton version#
The Ableton Version menu (in the Output card, and in Settings → Plan2Live Status) sets which Live the set is made for. Live 12 is the default and the one we recommend: it's the version Plan2Live's sets are checked in.
The menu also lists Live 10 and Live 11 (a Live 11 set is made in Live 10's format: open it in Live 11 and save it once). Choose them only if the Mac you play from has an older Live, and check the set carefully before you use it.
With a Custom Template, the version comes from your template, and the menu says "Set by your template".
Output Style#
The Output Style card picks what the set is built into:
- Default Template: Plan2Live's own built-in layout, with markers, stems and routing. Nothing to set up.
- Custom Template: your own Ableton template. See Custom Templates.
The built-in template#
In the built-in Live 12 template, every song gets its own block of tracks, named after the song and its key:
- a Markers track (MIDI) with the song's sections;
- a Cues group with Click and Guide;
- a Stems group with Drums, Perc, Loop, Bass, EG 1–4, Synth FX, Synth Bass, Piano, Organ and Keys 1–6;
- BGVs.
Stem tracks a song doesn't use are left out of that song. The songs sit one after another in Arrangement View, in your set's order, and the tempo and time signature change at the start of each song.
Which edition of Live#
Use Ableton Live Standard or Suite. Live Intro allows 16 audio and MIDI tracks and Live Lite allows 8, and the built-in template has 22 for a single song, so Intro and Lite are too small for it. A set with several songs has a block of tracks for each one.
Chapter 9
Custom Templates
Build the set into your own Ableton Live template, with your own tracks, colours and routing, instead of Plan2Live's built-in one.
Already have a rig: your own Ableton template with your tracks, groups, colours and routing? With Custom Templates, Plan2Live builds the new set into it, in Arrangement View, and puts each song's stems on your own tracks.
Custom Templates are in beta and open on every plan. It has been tested on a limited set of rigs so far, so try it with your rig well before a show.
What your template needs#
- An Ableton Live 12 set whose songs sit on the timeline (Arrangement View). A template built around Session View scenes is refused, and nothing is changed.
- Its own media, in its project folder. Plan2Live reads your lanes, colours and routing from a real set, so use one with audio in it, like last week's set. An empty template, or one whose audio has been moved away, leaves it nothing to read. If the audio lives outside the project folder, open the set in Ableton, use File → Collect All and Save, then choose it again.
- On this Mac. If the set lives in iCloud, Dropbox or OneDrive, download it to the Mac first.
- Not too big: the
.alsfile can be up to 64 MB.
Pick your template#
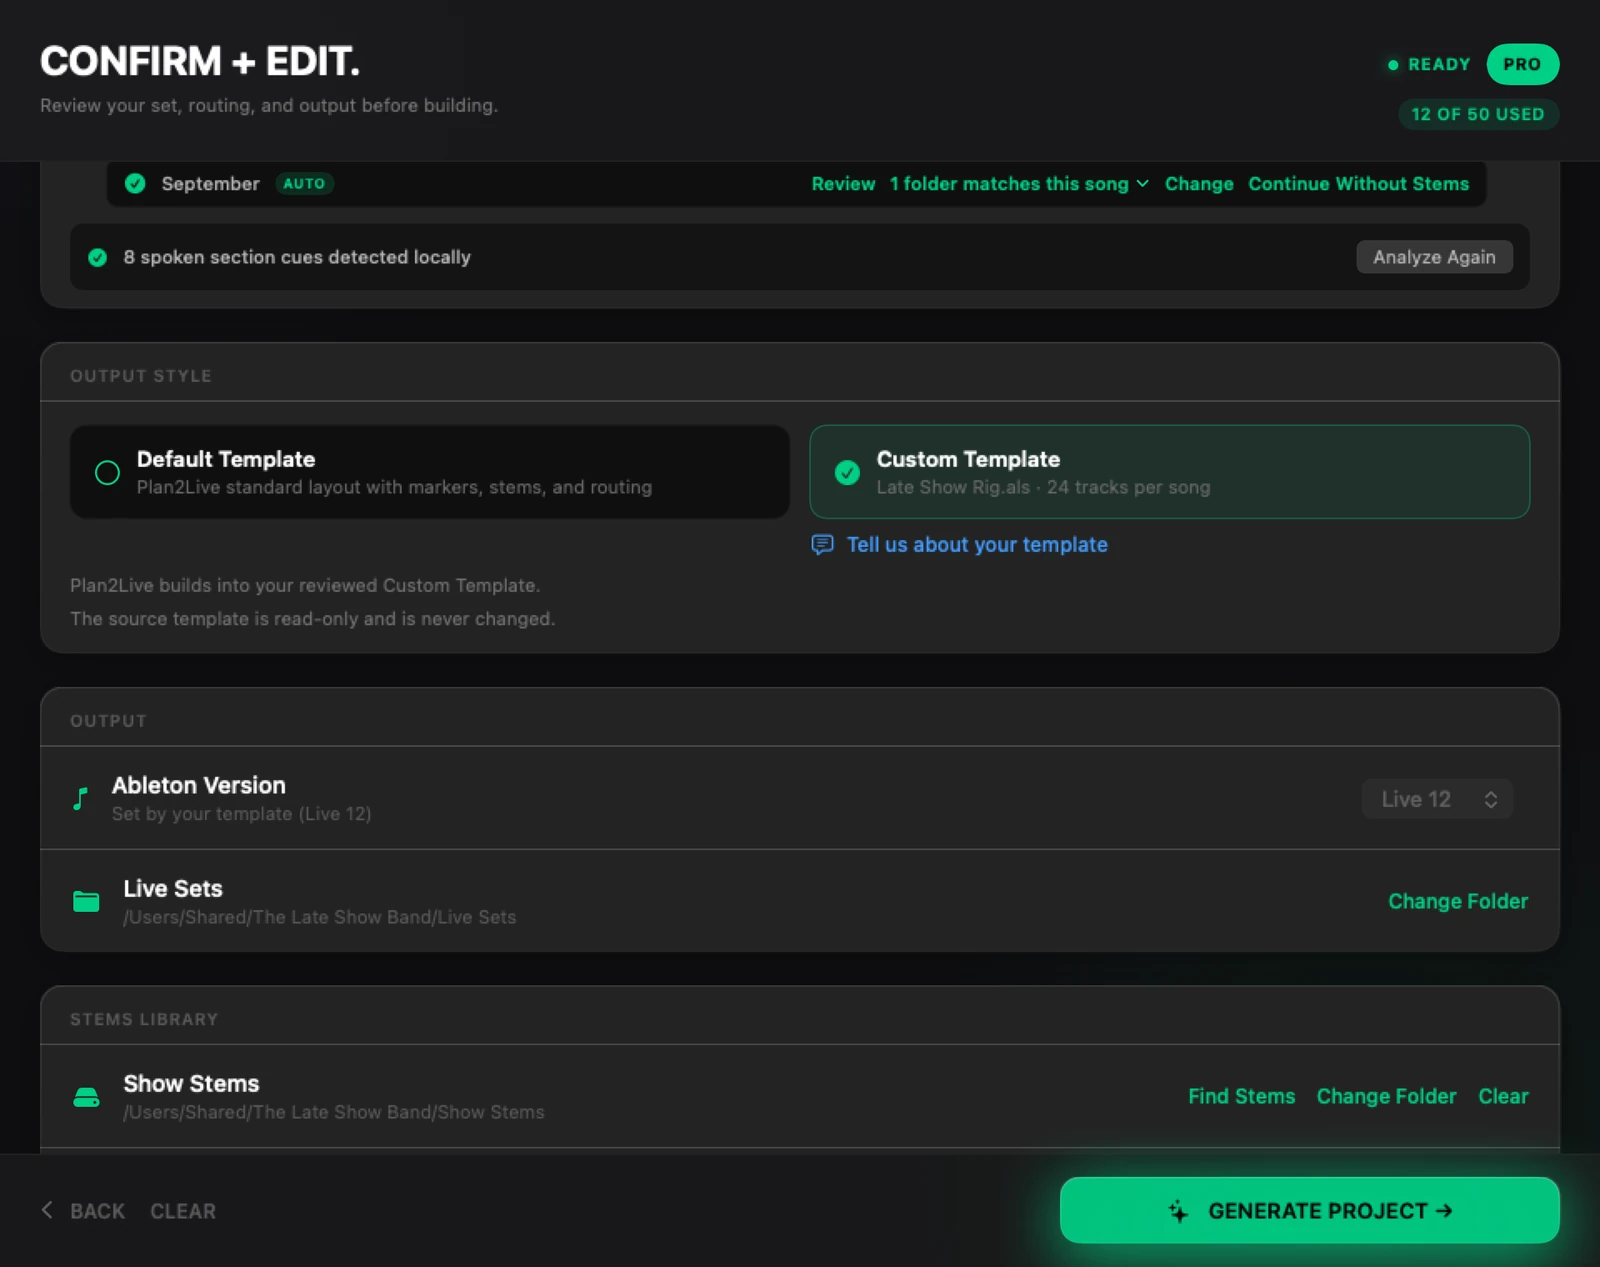
- On Confirm + Edit, in the Output Style card, click Custom Template.
- The first time, a note explains the beta. Press Choose Template Folder.
- Choose your Ableton project folder: the one that holds the
.alsand its audio. Nothing in it is changed. - If the folder holds more than one set, pick the one to build from and press Use This Set. If it holds none, Plan2Live looks nearby and suggests one ("Did you mean …?").
Plan2Live then reviews the template ("Reviewing …"). When it's done, the tile shows the template's name and how many tracks each song gets, and the Ableton Version menu says "Set by your template".
What the review tells you#
The review explains what Plan2Live found and what it will do. For example:
- Song slots. If your template has a group for each song, Plan2Live fills them in your set's order. If your set has more songs than the template has slots, it adds slots by copying your first one, and it removes empty slots left over. Each time, it tells you. If it can't see your song groups, it says how to name them.
- Lanes it leaves alone. Buses, Monitor In lanes and other pass-through lanes are recognized and left untouched, and the review lists them under LEFT UNTOUCHED IN YOUR TEMPLATE.
- Click and Guide. For each song it says where the Click and Guide went, or why one couldn't go somewhere (for example, if the only fitting lane is a Monitor In lane).
- Missing lanes. If your template has no lane for some of your stems, Plan2Live offers Add Plan2Live Stem Lanes, or Use Plan2Live Default Layout for the whole set.
When a template can't be used#
Some templates can't be built into (yet). Then Plan2Live says why, names the file, and changes nothing. A few examples:
- "…is not an Ableton Live Set…": choose the
.als's project folder. - "…has no audio track Plan2Live can put the stems or the guide on…": the template needs at least one audio track.
- "…opened as an Ableton Live Set, but Plan2Live cannot build into its layout yet…": build this set with the default template, and tell us about your template.
- "…has parts Plan2Live cannot rebuild safely on its own…": contact Plan2Live support and we'll look at the template with you.
If the build into your template fails, Plan2Live can build the same songs into its default template instead, so you still get a set, and the finished card says so. There's also a Use the Default Template button on a failed build. Your template file isn't changed; choose it again under Output Style to try it next time.
How long the beta lasts#
Custom Templates are open on every plan, Free included, for as long as they're in beta. The beta has no end date.
Tell us about your template#
The Tell us about your template sheet sends us your message and the shape Plan2Live measured (track and group counts, what it found). It never sends your lane names, your file name or the template itself. It goes out with usage analytics, so if you've turned those off, e-mail feedback@plan2liveapp.com instead.
Chapter 10
Building the set
Check every song on Confirm + Edit, press GENERATE PROJECT, and read the finished card.
Check everything on Confirm + Edit#
CONFIRM + EDIT. is where you look over the whole set before you build. From top to bottom:
- Project Name: what the set will be called.
- Set Builder (typed set) or Song Review (Planning Center): every song with its key, tempo and time signature, its stems folder, and its Guide.
- Output Style: the built-in template, or your Custom Template.
- Output: the Ableton version and the output folder.
- Stems Library: where Plan2Live looks for your stems.
- Options: Include stems, the Guide language and the marker style, and for a Planning Center set, where section names come from.
The GENERATE button tells you what's left#
The big button at the bottom says what to do next. When it reads GENERATE PROJECT →, the set is ready to build. Until then, it names the next thing to fix, for example:
| The button says | What to do |
|---|---|
| NAME YOUR PROJECT → | Type a name in Project Name. |
| ADD SONGS ABOVE → | Add at least one song. |
| 1 SONG NEEDS A TEMPO ↑ (or a key, or a time signature) | Fill it in on the highlighted song. |
| 1 SONG NEEDS A STEM DECISION → | Pick the song's folder, or choose Continue Without Stems. |
| REVIEW MATCHES → | Choose between the folders that match a song. |
| ANALYZING GUIDE… (from version 2.8.3, with several Guides, ANALYZING GUIDES… 3 OF 12 READY) | Wait: Plan2Live is reading the Guides. |
| 1 GUIDE COULD NOT BE READ ↑ | See If a Guide can't be read. |
| CHOOSE OUTPUT FOLDER → | Choose where to save the set. |
| SIGN IN TO CONTINUE → | Sign in to your Plan2Live account. |
| VIEW GENERATION OPTIONS → | You've used the builds your plan includes. See Plans and billing. |
| REVIEW YOUR PLAN → | Your plan needs a look: open your account. |
Build#
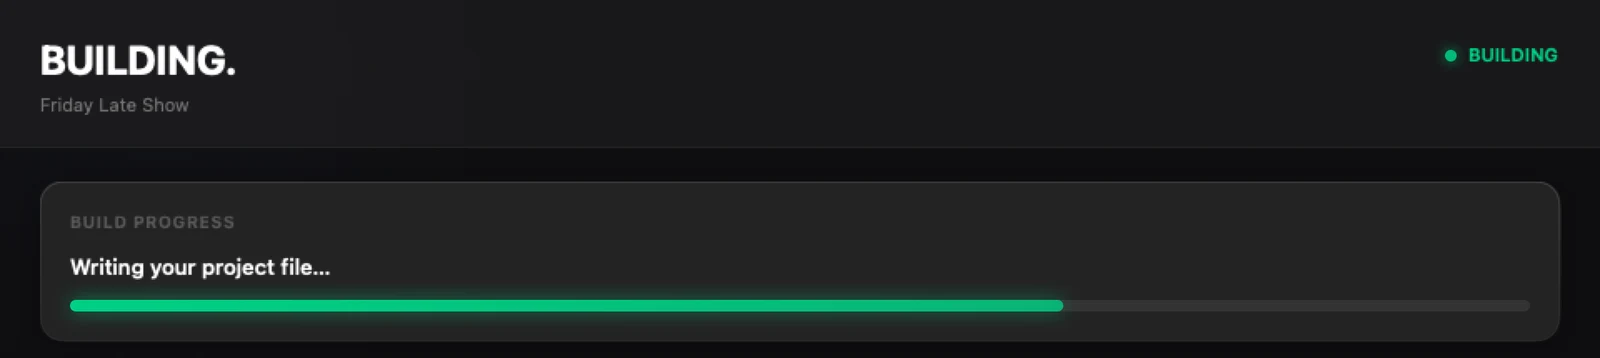
Press GENERATE PROJECT →. The BUILDING. screen shows each step: finding your stems, laying out the set and its section markers, building the Ableton project, writing the project file and finishing the session. (The Guides were already read on Confirm + Edit.)
Changed your mind? Press CANCEL. A canceled build isn't saved to your output folder, and TRY AGAIN starts it again.
A set with very little audio#
From version 2.8.4, on the Free plan, Plan2Live asks before it builds a set with very little audio in it: fewer than 3 music stems in the whole set, or only a click or a Guide. The question is This set has very little audio, and it says how many music stems would go in, for example "Only 1 music stem would go into this set. Building it uses one of your free builds. Check the stems folders first, or build anyway."
- Check Stems Folders takes you to the song with the fewest music stems, so you can pick its folder or its stems again.
- Build Anyway builds the set as it is. It doesn't ask again for the same files.
- Cancel goes back to Confirm + Edit.
Asking doesn't use a build: only a set that is built does. On a paid plan, or with Include stems turned off, Plan2Live doesn't ask.
The finished card#
When the set is ready, the screen says DONE. and the card says PROJECT READY, "Saved safely to your selected output folder." It shows how many songs and stems went in.
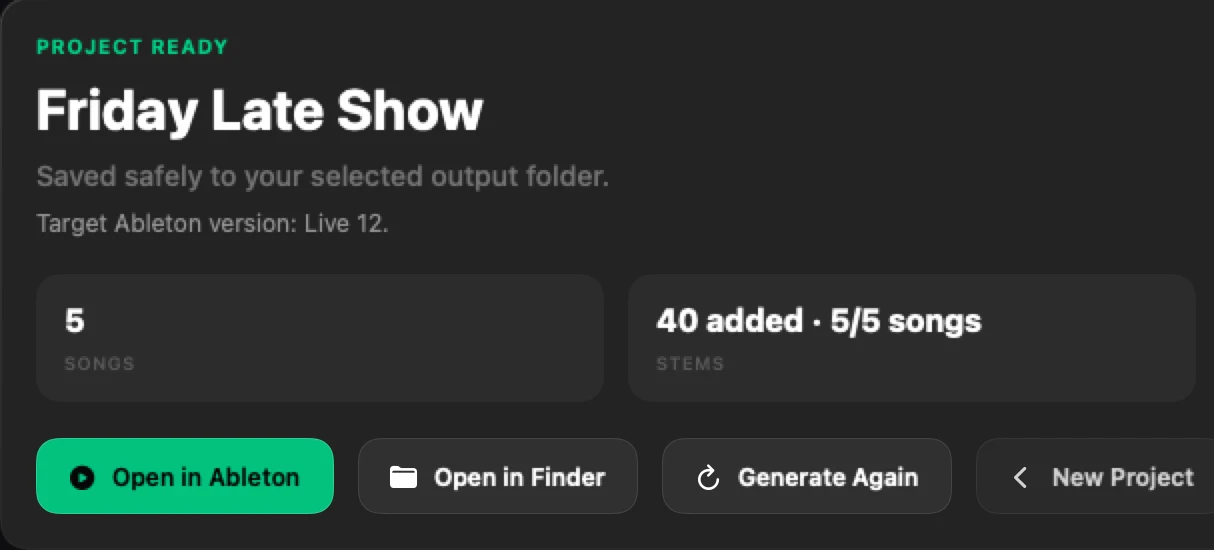
- Open in Ableton opens the set in Ableton Live. See Opening the set in Ableton Live.
- Open in Finder shows the project folder.
- Generate Again takes you back to the same project, to change something and build again.
- New Project starts a new set.
From version 2.8.3, the card on the Free plan also says where your free builds stand, once our server has counted the build:
- "You have 1 free build left." with Build Your Next Set, which starts a new project.
- When that was your last one: "You've used your 2 free builds.", what Plus gives you and its price from the plan list, and See Plans.
From version 2.8.4, when that was your last free build, the card lets you choose right there: "Choose a plan to keep building. Checkout opens in your browser." Plus and Pro sit side by side, each with its builds a month and its price from the plan list, shown Yearly first (switch to Monthly if you'd rather). Each has its own button, like Start Plus Yearly →, that opens that plan's Stripe checkout in your browser. See Plans is still there and opens the whole plan list. If the app couldn't load the plan list, See Plans is the card's only button.
When you're signed in, the card can also show your invite link to send to a friend, with Copy Link (or Open Account Page when the app can't read it). See Plans and billing.
Sometimes the card has a different label, with the details underneath:
- GENERATED WITH WARNINGS: the set was built, but something needs a look (read the notes on the card).
- SONGS LEFT OUT: some songs' stems didn't make it into the set, for example because no folder was found for them, or you chose Continue Without Stems. The card says how many made it ("Built 4 of 5 songs."), names each song left out, says why, and what to do.
- NO SONG AUDIO: the set was built with no stems at all.
The card also lists songs whose markers are placeholders, and any stems that were transposed.
If a build stops#
If something stops the build, the screen says FAILED. (or STEMS NOT FOUND.), and the card says what happened and what to do. The button on the right does the next step for you, for example Choose Another Output Folder, Free Up Space on This Mac, CHOOSE STEMS LIBRARY, Reconnect Planning Center or TRY AGAIN. RETURN TO PROJECT takes you back with everything as it was.
A build that fails, or is stopped before it starts, doesn't use up one of your builds. Only finished sets count.
Build Details#
Open BUILD DETAILS on the card to see the output path, what the final check found, and an activity log. Open Diagnostics in Finder shows a small troubleshooting package saved on your Mac, which you can send to support. It holds build status and error codes only: never audio, file names, folder paths or transcripts. See Getting help.
For the common messages one by one, see Troubleshooting.
Chapter 11
Opening the set in Ableton Live
Open the finished set, check it before rehearsal, find past sets in Project History, and move a set to another Mac.
Open it#
On the finished card, press Open in Ableton. Plan2Live opens the set in the Ableton Live installed on your Mac that fits the version the set was made for. If you have more than one edition, it picks Suite first, then Standard. A set made for Live 12 opens only in Live 12.
If Plan2Live can't find a Live that fits, it says so: install it, or press Open in Finder and open the .als yourself.
You can always open a set by hand: in Finder, go to your output folder, open the project folder (for example Friday Late Show Project) and double-click the .als inside.
Check it before rehearsal#
Plan2Live builds the set; you know the show. Before the first rehearsal, take a few minutes in Live:
- Play through each song's start. Check that the stems play and line up.
- Check the click. Each song with a click stem has it on its Click track. (The built-in template never makes a click of its own.)
- Look at the markers. Named sections come from your Guide's spoken cues (or from Planning Center). Numbered or placeholder markers mean no names were heard: rename them in Live if you like.
- Check tempo and time signature at the start of each song.
- Check your outputs (your audio interface's routing) the way you always do before a show.
If something is wrong in the set, fix it at the source (the song's details, or its stems folder) and build again. Then the next build is right too.
What's in the set#
- The songs, one after another in Arrangement View, in your set's order.
- At each song's start, its tempo and time signature.
- A block of tracks for each song, named after the song and its key: Markers, Click and Guide, the stem tracks the song uses, and BGVs. See The built-in template.
- Section markers (locators), in the marker style you chose.
- A copy of every stem, inside the project folder.
Project History#
On Pro and Premium, Project History keeps every set you've built on this Mac. Open it with History in the toolbar, or Go → Project History… (⇧⌘H).
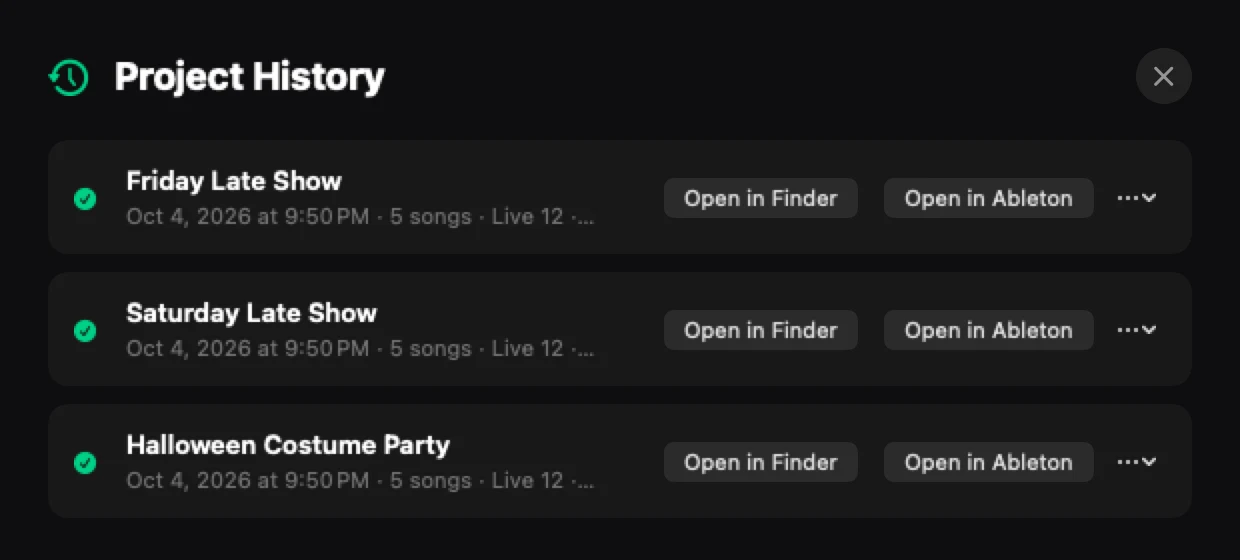
Each set shows its date, how many songs it has, and the Live version. Press Open in Ableton or Open in Finder next to it. Remove from History (in the … menu) takes a set off the list; it doesn't delete the project.
On Free and Plus, History tells you it's part of Pro and Premium.
Move a set to another Mac#
The project folder holds the set and a copy of every stem it uses. To play it from another Mac, copy the whole project folder (not just the .als) to that Mac or to your show drive, then open the .als from there. If you change the set in Live and add new audio, use File → Collect All and Save in Live before you move it again.
If the other Mac has an older Live, build the set for that version (see Choose the Ableton version).
Chapter 12
Settings and your account
Every section of the Settings window, and what each one does.
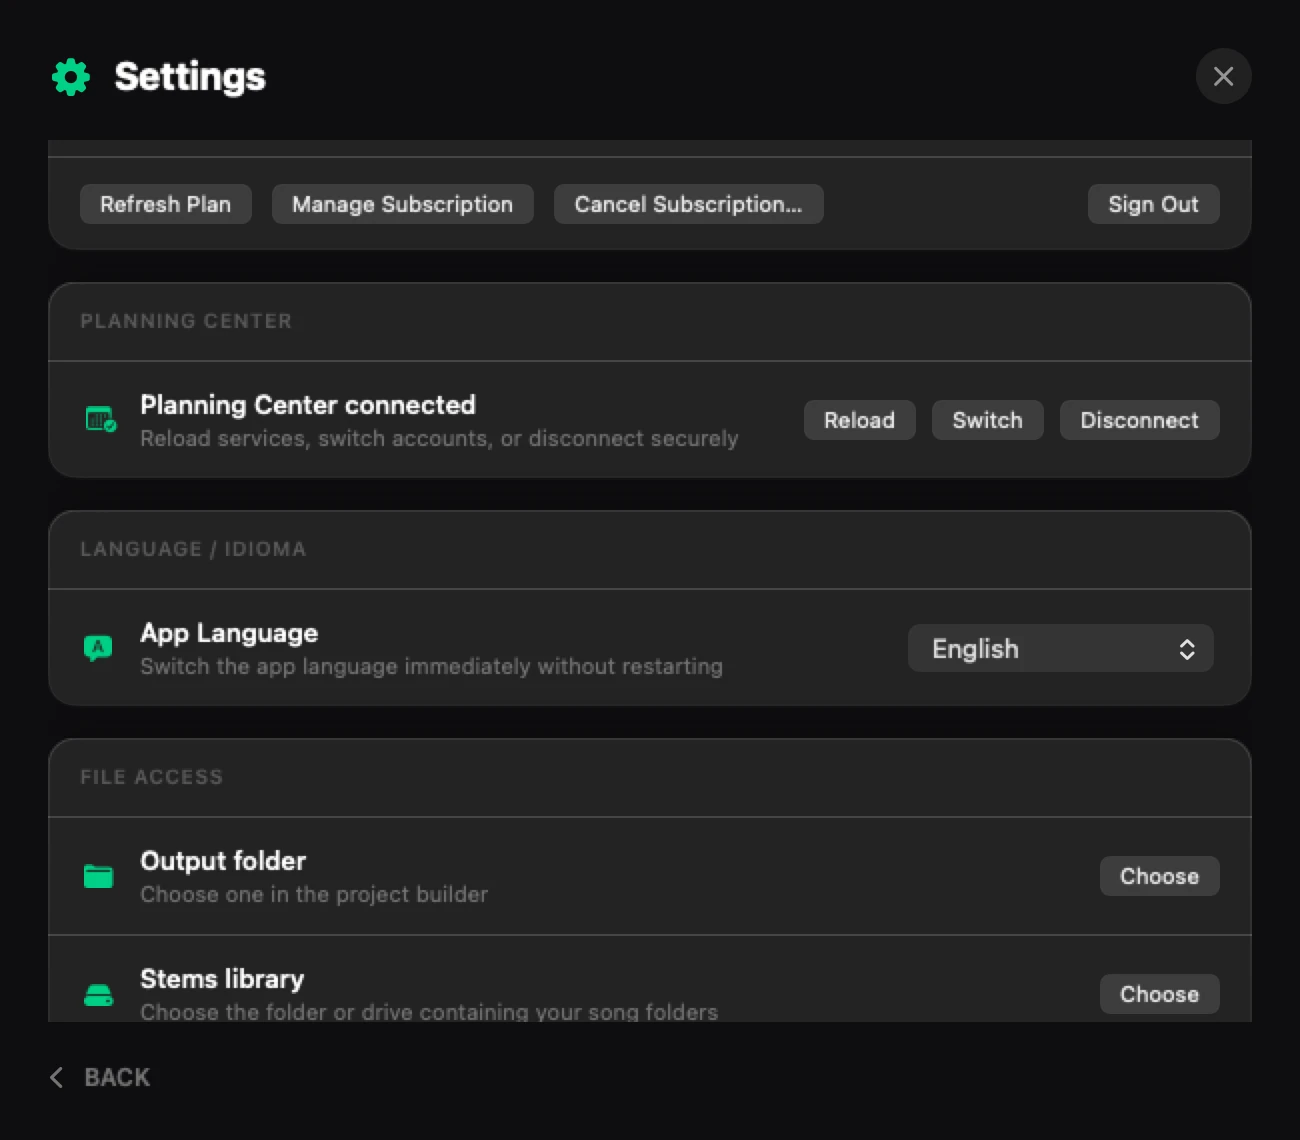
Open Settings with ⌘, (Command-comma) or the Settings button in the toolbar.
Account & Billing#
Your name and e-mail, your plan, and how many builds you've used ("38 remaining · 12 of 50 used"). It also shows what your plan includes: Planning Center, Project History and Custom Templates.
- Refresh Plan checks your plan again (after you upgrade on the website, for example).
- Upgrade → (on Free) opens the plan picker. From version 2.8.4, its Plus and Pro cards open on Yearly, and Premium's says Coming later. See Plans and billing.
- Manage Subscription (when you pay for a plan through Stripe) opens Stripe's billing page in your browser, where you can update your card.
- Cancel Subscription… (the same) opens Stripe's page for cancelling your subscription.
- Sign Out signs you out of the app.
Planning Center#
Shows whether Planning Center is connected, or, if something went wrong, what it was (from version 2.8.3, for example "Check your Planning Center credentials" or "Planning Center asked Plan2Live to wait"). Reload loads your plans from Planning Center again, Switch connects a different Planning Center account, and Disconnect removes the connection from this Mac. See Importing from Planning Center.
Language / Idioma#
App Language switches the app between English and Español (or follows your Mac with System / Sistema), right away, without restarting.
From version 2.8.3, the whole app follows it: its screens, windows and messages, including the sign-in and Create account screen, Settings, the plan picker and the guided tour. (In version 2.8.2, some windows, like Settings and the plan picker, stayed in your Mac's language.) The language your Guide tracks are spoken in is a separate choice: see Pick the Guide's language.
File Access#
- Output folder: where finished sets are saved. See Output folder and Ableton version.
- Stems library: the folder or drive with your song folders, with Find Stems, Choose / Change and Clear.
- Additional stems libraries: more folders to search, with Add Library and Remove. See Your Stems Library.
Help#
- Getting Started plays the introduction again.
- Run Setup Wizard goes through the setup again.
- Privacy & Terms opens the Privacy Policy and the Terms on plan2liveapp.com.
Privacy & Diagnostics#
Share usage analytics is on unless you turn it off. It lets the app send us which features you use and whether each build worked. See Privacy and permissions.
Plan2Live Status#
Shows whether the app is ready, the Ableton Version menu (the same one as on Confirm + Edit), and "Project building: On this Mac": every set is built on your own Mac.
Chapter 13
Updating Plan2Live
How Plan2Live finds and installs new versions, and what to do if an update doesn't come through.
Updates find you#
Plan2Live checks for a new version on its own when you open it and regularly while it's open. When there is one, it downloads it and asks you to install it: "Plan2Live will ask you to install it as soon as it's ready." Some updates are required; then the button says Install Required Update.
From version 2.8.4, it checks about once a day: when you open it, if it hasn't checked in the last day, and then once a day while it stays open. (Version 2.8.3 checked more often.)
To check right now, choose Plan2Live → Check for Updates… in the menu bar. If you're up to date, it says "You're using the latest version of Plan2Live."
The Updates page on the website lists every version.
If an update doesn't come through#
- "The update didn't download." Plan2Live tries again by itself, waiting a little longer each time (5, then 15, then 60 minutes). From version 2.8.4, if it keeps failing, the waits go on to 4 hours and then a day, and the message says so, for example "The update didn't download. Plan2Live will try again in 4 hours." The same goes for "Plan2Live couldn't check for updates."
- "You're offline." It tries again when you're back online.
- "Plan2Live is running from the download window, so it can't update itself." Quit Plan2Live, drag it into Applications, and open it from there. Press Show Me How for the steps. The same goes for "macOS is running Plan2Live from a temporary copy".
Still stuck? Download the latest version from plan2liveapp.com and install it over the old one (choose Replace). Your account, your settings and your sets stay as they are.
Before a show#
Update when you have time to build and check a set, not an hour before a service or gig. If you're mid-week with a set that works, finish the week, then update.
Chapter 14
Troubleshooting
The messages you're most likely to see, what they mean, and what to do about each one.
Plan2Live tries to say what went wrong in plain words, right where it happened, with a button for the next step. This chapter collects the common ones.
Stems#
| You see | What to do |
|---|---|
| "Plan2Live couldn’t match this folder automatically." | Press Choose Folder or Drive and pick the song's folder. Next time, name the folder after the song (see Folder names). |
| "2 folders match this song" | Press Review Matches and pick one. A key in the folder names helps Plan2Live choose by itself. |
| STEMS NOT FOUND. after you press GENERATE | No stems were found for the songs. Check that your Stems Library is the folder that holds your song folders, then press CHOOSE STEMS LIBRARY. |
| A file marked Needs a track | In Review Stem Matches, choose a track for it, or Skip this stem. |
| "…Plan2Live reads WAV, AIFF, FLAC, MP3, M4A, and CAF files…" | A stem is in a format Plan2Live can't read. Export it again as WAV or AIFF. |
| "Plan2Live stopped searching early because this library is very large." | Move your song folders higher up, or add a more specific folder as your library. |
| "…macOS is not letting Plan2Live use that folder." | Choose the folder again, so macOS gives Plan2Live permission to read it. |
Guide and markers#
| You see | What to do |
|---|---|
| "Reading Guide cues locally. Generate unlocks when this Guide is ready." | Nothing: wait for it to finish. |
| "No spoken section names were recognized, so sections are numbered." | The Guide's timing was used, but no section names were heard. Rename the markers in Live, or check the Guide Language. |
| "No spoken section cues for: …" on the finished card | Those songs have placeholder markers. Rename them in Live, or add a Guide with spoken cues and build again. |
| A Guide that can't be read | Press Try Again, or Build Without This Guide (see If a Guide can't be read). |
| "This Guide audio is too long to analyze safely." | The message says how long a Guide can be. Build without it, or use a shorter Guide file (from version 2.8.3, Choose Song Folder picks the folder again once the shorter Guide is in it). |
| "Guide analysis is queued: … Guides are ahead of this one." | Nothing: Plan2Live reads one Guide at a time, and this one is waiting its turn (from version 2.8.3). |
Saving and building#
| You see | What to do |
|---|---|
| STARTUP DISK FULL | Your Mac's startup disk needs room to build the set, even if your output folder is on another drive. Press Free Up Space on This Mac. |
| OUTPUT FOLDER ERROR, or "Plan2Live cannot save into the folder you chose…" | Press Choose Another Output Folder and pick an ordinary folder. |
| NAME ALREADY USED | A set with this name is already there. Use the button to build under a free name, or rename the project. |
| BUILD BUSY | Another build is running. Wait for it to finish. |
| ACCOUNT NEEDED | Press OPEN ACCOUNT and sign in, then go back to the project. |
| RECOVERY NEEDED | A build was interrupted and Plan2Live needs to check what it left. Press FINISH RECOVERY. |
| "Plan2Live's native engine could not start." | Quit Plan2Live and open it again. |
| This set has very little audio (on Free, from version 2.8.4) | Only a few music stems, or only a click or Guide, would go into the set. Press Check Stems Folders to look at the song with the fewest, or Build Anyway if that's the set you want. See A set with very little audio. |
Planning Center#
| You see | What to do |
|---|---|
| CONNECTION ERROR on the Planning Center screen | Plan2Live couldn't reach Planning Center. Check your internet connection, then press Refresh, or Reload in Settings → Planning Center. |
| CHECK CREDENTIALS (from version 2.8.3) | Planning Center didn't accept the App ID and Secret. Enter them again in Settings → Planning Center (in version 2.8.2 this also showed as CONNECTION ERROR). |
| TOO MANY REQUESTS (from version 2.8.3) | Planning Center asked Plan2Live to wait. Wait a moment, then press Refresh. |
| "This Planning Center plan has no song items to import." (from version 2.8.3, with the label NO SONGS TO IMPORT) | Add the songs to the plan as songs in Planning Center, then import again. |
| A song comes in with no key, tempo or time signature | Fill it in on the song's row. See If something is missing. |
Your plan#
| You see | What to do |
|---|---|
| Premium's card says Coming later (from version 2.8.4) | Premium isn't sold in the app. Plus and Pro are. See Upgrade. |
Custom Templates#
If your template is refused, the message names the file and says why. See When a template can't be used.
Opening and updating#
| You see | What to do |
|---|---|
| "Plan2Live couldn't find a compatible Ableton Live app for this project." | Install the Live version the set was built for, or press Open in Finder and open the .als yourself. |
| "Plan2Live is running from the download window, so it can't update itself." | Drag Plan2Live into Applications and open it from there. |
| "Plan2Live couldn't check for updates. It will try again in 4 hours." (from version 2.8.4) | Nothing: it tries again by itself, or choose Plan2Live → Check for Updates… to try now. See If an update doesn't come through. |
| The set opens in Live, but audio is missing | Open the .als from inside its project folder, and keep the whole folder together when you move it (see Move a set to another Mac). |
Still stuck?#
See Getting help: tell us what happened, and send us the Diagnostics folder if you can.
Chapter 15
Privacy and permissions
What Plan2Live does on your Mac, what the app sends us, how to turn analytics off, and which permissions Plan2Live asks for.
What Plan2Live does on your Mac#
- It builds every set on your Mac ("Project building: On this Mac"), from the stems in the folders you choose.
- It reads your Guide tracks on your Mac. The audio isn't uploaded, and the app doesn't use your microphone.
- It reads your Custom Template on your Mac, and doesn't change the template file.
- It keeps your logins in your Mac's Keychain: your Planning Center App ID and Secret, and your Plan2Live sign-in.
What the app sends us#
We keep your account e-mail and name, your plan, and how many builds you've used. If you tick the news-and-tips box or enter an invite code when you create your account in the app (from version 2.8.3), we keep that too. The app's usage analytics tell us how it's used: which features you use, whether each build worked, and the song titles, keys, tempos and time signatures in the sets you build (that's how we find out which songs fail), plus things like your Mac's model, your macOS and app versions, and how quickly the app responds. They know you by your account ID, not your name or e-mail, and they work out your approximate location (city and country) from your internet address.
The app never sends us your audio files, your Ableton sets or templates, your Planning Center login, or the names of your files and folders. We don't sell your data, and we don't record your screen.
The full list is in the Privacy Policy.
Turn analytics off#
Usage analytics are on by default. To turn them off, go to Settings → Privacy & Diagnostics and switch off Share usage analytics. Plan2Live doesn't upload macOS crash reports.
Permissions#
Plan2Live only reads the folders you choose:
- Your stems libraries, your output folder and your Custom Template's folder. You pick each one in a normal Mac file window, and that's what gives Plan2Live permission. It remembers them, so you don't pick them every time. If macOS stops letting it use a folder, it asks you to choose the folder again.
- Google sign-in opens macOS's standard web sign-in sheet.
- Opening Ableton uses the normal way the Mac opens a file, so there's no "control another app" permission to give.
Plan2Live doesn't ask for your microphone, your camera, your contacts or Full Disk Access.
Chapter 16
Plans and billing
What each plan includes, what counts as a build, how to upgrade, and how to manage or cancel your subscription.
What a build is#
A build is one Ableton Live set made from your setlist: one press of GENERATE PROJECT that finishes. Building the same set again (after a change, say) is another build.
A build that fails, or is stopped before it starts, doesn't count. Only finished sets do.
The plans#
Free
FreeBuild a real set before you pay anything.
- Try it all: 2 free builds with every feature Plus has
- No card needed, and your free builds never reset
- Planning Center import: the whole plan in one go, or type your setlist
- Open in Ableton: the finished set opens in Live in one click
Plus
$69/yr or $7/mo; from Nov 14, 2026, new subscribers pay $79/yr or $9/moFor a new set every week.
- 20 builds a month
- Most sets build in under a minute on an Apple Silicon Mac
- Guide analysis: section markers named from your Guide's spoken cues
- Tempo automation: each song's tempo and time signature written into the set
- Transpose stems: stems moved to the song's key when a folder is in another key
- Stem auto-wire: every stem on its own track, Click and Guide included
- Planning Center import: the whole plan in one go, or type your setlist
- Planning Center Labels: section names from your Planning Center arrangements
- Marker styles: Regular locators, AbleSet Locators or AbleSet Sections
- Open in Ableton: the finished set opens in Live in one click
- Custom Templates: build into your own Ableton template (beta, on every plan)
Pro
$129/yr or $16/mo; from Nov 14, 2026, new subscribers pay $149/yr or $19/moFor several sets a week.
- Everything in Plus, and:
- 50 builds a month
- Project History: every set you've built, ready to reopen in Ableton or Finder
Premium
Coming laterFor the most builds.
- Everything in Pro, and:
- 200 builds a month
New prices for new subscribers start Nov 14, 2026. Subscribed before then? You keep the price you pay for as long as you stay subscribed.
- Free gives every account 2 builds in total, with no card. They don't reset, and they don't expire. Free builds have every feature Plus has: the Free card lists only the basics, but nothing is held back.
- Plus, Pro and Premium give you a number of builds each month: 20, 50 and 200.
- Every plan, Free included, has the same features: Guide analysis, Tempo automation, Transpose stems, Stem auto-wire, Planning Center import, Planning Center Labels, Marker styles and Open in Ableton. Each one is explained in this manual.
- Pro and Premium add Project History.
- Custom Templates are in beta and open on every plan. See Custom Templates.
You can see your plan and how many builds you've used in Settings → Account & Billing.
When you run out of builds#
On Free, after your 2 builds, the app asks you to choose Plus or Pro to keep building. On a paid plan, when the month's builds are used, the GENERATE button says VIEW GENERATION OPTIONS →.
From version 2.8.3, the finished card on Free tells you how many free builds you have left. After your last one it says "You've used your 2 free builds." and what Plus gives you (20 builds a month, with everything you have on Free), at the price on the plan list, with See Plans. See The finished card.
From version 2.8.4, both places let you choose without looking further: the finished card after your last free build, and the Choose Plus or Pro to continue screen the app shows once your free builds are used. Plus and Pro sit side by side, with their builds a month and their prices from the plan list, shown Yearly first (you can switch to Monthly). Each has a button, like Start Plus Yearly → or Start Pro Yearly →, that opens that plan's Stripe checkout in your browser straight away.
Upgrade#
- On the website: go to Pricing, choose Yearly or Monthly, and press Get Plus or Get Pro. Sign in (or create your free account) if you haven't, then pay with Stripe. Yearly costs less than twelve months.
- In the app: press Upgrade → in Settings to open PICK YOUR PLAN. Plus and Pro open the same Stripe checkout in your browser. From version 2.8.4, their cards open on Yearly; switch a card to Monthly if you'd rather pay by the month.
Premium is coming later: it isn't on sale yet. The app doesn't sell Premium: from version 2.8.4, Premium's card in the plan list says Coming later, with no price and no checkout. If you already have Premium, its card says CURRENT. The prices in the plan list are the ones a new subscriber pays.
After you pay, press Refresh Plan in Settings if the app doesn't show your new plan yet. Stripe e-mails you a receipt.
Change your plan#
Already subscribed and want a different plan? Switching isn't self-serve on the website yet. E-mail feedback@plan2liveapp.com and we switch it for you on your current subscription, so there's no second charge.
From version 2.8.3, if you already pay for a plan and pick a bigger one in the app's plan list, the app opens Stripe's billing page for your subscription instead of starting a second checkout.
Manage or cancel#
You can do it in two places.
On your account page on plan2liveapp.com:
- Manage billing → opens Stripe, where you can update your card.
- Cancel subscription → cancels it.
In the app, from version 2.8.3, in Settings → Account & Billing:
- Manage Subscription opens the same Stripe billing page in your browser.
- Cancel Subscription… opens Stripe's page for cancelling it.
Either way, your plan stays active until the end of the period you've paid for, then your account goes back to Free.
Prices are in US dollars and don't include taxes that may apply.
Chapter 17
FAQ
Short answers to the questions people ask most, with links to the chapter that explains more.
Do I need Planning Center?#
No. Type your setlist into Plan2Live: each song is a title, key, tempo and time signature. If your team plans in Planning Center, you can import the whole set from it instead. See Typing your setlist.
Can I bring in a whole set at once?#
Yes, from Planning Center: importing a plan fills the whole set in one go. Without Planning Center, add the songs with + Add Song: each one is just a title, key, tempo and time signature.
Does Plan2Live include stems?#
No. It uses the stems you already have, in your own folders. See Stems: folders and matching.
Does it make a click?#
No. The built-in template doesn't make a click. Bring a click stem for each song and it goes on the song's Click track. See Click and Guide tracks.
Where do the section names come from?#
From the spoken cues on each song's Guide track ("verse", "chorus"), in English, Spanish or Portuguese, or from Planning Center. Without either, the markers are numbered or placeholders you can rename in Live. See Guide analysis and section markers.
Which Ableton Live do I need?#
Ableton Live 12 Standard or Suite is recommended. Intro and Lite allow too few tracks for the built-in template. See Output folder and Ableton version.
Does it work in Session View?#
No. Plan2Live builds in Arrangement View, with the songs one after another on the timeline.
Does Plan2Live play the set at the show?#
No. It builds the Ableton Live set, and you play it in Ableton Live like a set you made yourself.
Can I use my own template?#
Yes, with Custom Templates. Custom Templates are in beta and open on every plan. See Custom Templates.
What happens to my stems?#
Plan2Live copies the stems each set uses into that set's project folder, so the set has everything it needs. Your original folders aren't changed. See What a finished set looks like.
Does it change keys?#
If a song's stems folder says it's in one key and the song in your set is in another, Plan2Live transposes the stems to match, up to 6 semitones. Drums, percussion, loops, the click and the Guide are never transposed. See Stems in another key.
Is the app in Spanish?#
Yes. In Settings → Language / Idioma, set App Language to Español. From version 2.8.3, the whole app follows it: its screens, windows and messages. See Language / Idioma.
Can I cancel in the app?#
Yes, from version 2.8.3: Settings → Account & Billing → Cancel Subscription…. Or use the account page on the website, which works with every version. See Manage or cancel.
Why do I need an account?#
Your 2 free builds and your plan are kept on your account, so they're the same on every Mac you sign in on. It's free, with no card. See Your account.
Can I buy Premium in the app?#
No. The app sells Plus and Pro. From version 2.8.4, Premium's card in the app says Coming later. See Upgrade.
Do failed builds count?#
No. Only finished sets count as builds. See Plans and billing. On Free, from version 2.8.4, the app also asks before it builds a set with very little audio, so a free build isn't used by mistake. See A set with very little audio.
Does it run on Windows, or on an iPad?#
No. Plan2Live is a Mac app (macOS 14.6 or later, Apple Silicon or Intel).
Is my audio uploaded?#
No. The app never sends us your audio files, your Ableton sets or templates. See Privacy and permissions.
Chapter 18
Getting help
How to reach us, and what to send so we can help quickly.
E-mail us#
Write to feedback@plan2liveapp.com.
To help us help you, tell us:
- what you were doing, and what you expected to happen;
- the exact words on the screen (a screenshot is perfect);
- your Plan2Live version (in the menu bar, Plan2Live → About Plan2Live), your macOS version and your Ableton Live version;
- whether you typed the setlist or imported it from Planning Center.
Send the Diagnostics folder#
When a build stops, open BUILD DETAILS on the card and press Open Diagnostics in Finder. Attach that folder to your e-mail. It's a small troubleshooting package with build status and error codes only: never audio, file names, folder paths or transcripts.
Tell us from the app#
On a failed card, or a finished one with warnings, Tell us what happened sends us a note. For a Custom Template, use Tell us about your template (see Tell us about your template). Both go out with usage analytics, so if you've turned those off, e-mail us instead.
More help#
- Troubleshooting: the common messages and what to do.
- Install guide: download, install, and what to do if macOS blocks the app.
- FAQ: questions about plans, privacy and the app.